|
|
|
|
|
|
|
|
|
|
|
|
|
|
|
|
|
|
|
|
|
|
|
|
|
|
|
|
|
|
|
INTRODUCTION
Thank you for purchasing the Gravis 16-bit Recording Option. UltraSound, with
its wavetable synthesis and RAM-based, expandable General MIDI system, is the
state of the art in PC sound technology. This option board adds 16-bit, 48 kHz,
studio-quality digital recording capability, with hardware compression and full
audio mixing of up to four sources. Several DOS and Windows applications are
included to fully exploit the new capabilities of your UltraSound system.
16-BIT RECORDING OPTION BENEFITS & FEATURES
Professional-quality 16-bit recording at up to 48 kHz sampling frequency.
ADPCM, ų-law, and A-law real-time data compression and decompression
in hardware.
Fully programmable audio mixing of mono microphone, stereo line, and
stereo CD.
MPC and MPC-2 compatible.
Digital recording studio software for both DOS and Windows.
NEW SOFTWARE INCLUDED
Ultrasound Studio
10-track digital recording studio for DOS with reverb, echo, fade, time compress,
and other effects.
Wave Lite
Windows digital audio recorder and editor loaded with features. Edits up to four
.WAV files at one time.
Ultrasound1 Mixer for Windows
Full control of stereo MIDI wavetable synthesis and Windows .WAV output.
Allows mixing of four input sources.
Patch Maker Lite
Now edit and create your own instruments with this exclusive UltraSound patch
editor!
INSTALLING THE 16-BIT RECORDING OPTION
Before you begin...
|
|
|
|
|
|
|
|
You must set jumpers on your 16-bit card
before you attach it to your UltraSound.
These jumpers determine which Base
Address, DMA, and IRQ settings will be
used by the card.
|
|
|
|
|
|
|
Default Choices
Base Address 530 530,604,E80,F40
DMA 3 1.2*, 3
IRQ 5 3, 4, 5,6,7,9**
|
|
|
|
|
|
|
|
|
|
|
|
|
|
* DMA channel 2 is a possible setting for the jumpers; however, on ATs this channel is used for floppy disk
drives, so it is strongly recommended that you do not select it.
** Do not select IRQ 9 if another device is using IRQ 2 (IRQ 2 cascades to IRQ 9).
|
|
|
|
|
|
|
|
|
|
|
|
|
|
|
|
|
|
|
|
|
|
|
Refer to Figure 2 and the charts printed on the 16-bit card to see how to set the
jumpers for the available choices.
The defaults should work for most computer systems. However, if you have other
equipment in your computer which uses one of those settings, you will need to
change either the setting on the 16-bit card or on the conflicting equipment.
Note! To avoid conflicts, record all current addresses, IRQs (Interrupt Requests)
and DMAs (Direct Memory Access Channels) used by other adapter cards in
your system beforeyou install the 16-bit recording card.
The I/O Port Address on the 16-bit card MUST BE UNIQUEnot the same as
your UltraSound (or any other device in your system)or your card won't
work.
A conflict may occur if you have a printer connected to LPT2 (Printer 2)
because LPT2 uses IRQ 5, the same IRQ as the 16-bit recording card uses by
default.
The selections will be tested during the software installation after you have
installed the card. If the settings need to be changed, you will have to remove the
card and move the jumpers. It is recommended that you consider carefully any
possible conflicts with other equipment in your PC before doing the hardware
installation.
|
|
|
|
|
|
|
|
A NOTE ABOUT HIGH-SPEED RECORDING
Recording at or near the maximum capacity of the 16-bit recording option (for ex-
ample, 16-bit stereo at 44.1 kHz) can strain the throughput capacity of many PC
systems. You may encounter a situation where you start recording in an applica-
tion, but cannot get the application to respond to your command to stop because
it is too busy keeping up with the recording. "Runaway" recordings like this can
occur with any sound card or software when high throughput recording is
attempted.
If runaway recording occurs in Windows, you can stop it by pressing
<Ctrl>+<Alt>+<Del>. You will then be given the option to stop the application. In
any case, any time a recording ends abnormally, it is a good idea to run CHKDSK
on your disk.
You should be able to get reliable high-speed recordings without runaway if you
observe the following:
Do not record to a disk that is using a compression scheme (such as
DoubleSpace). The disk compression algorithms slow down the transfer of
data.
Be sure that the disk you are recording to is not badly fragmented. Use a disk
defragmenting program such as DEFRAG, which comes with MS DOS v.6.0
and later.
« If you are still having problems, consider recording to a RAM disk. MS DOS
and Windows users can set up a RAM disk using the RAMDRIVE program
that comes with DOS.
|
|
|
|
|
|
|
|
installing the Option card
» Turn off your computer, but leave it plugged in so that grounding is still
present.
Ground yourself by touching your computer's case, or wear a grounding wrist
strap when handling the 16-bit card to avoid damage from static discharge.
|
|
|
|
|
|
|
|
|
|
|
|
|
|
|
|
|
|
|
|
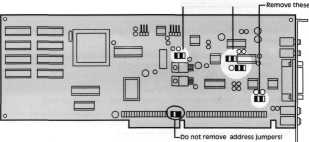
» REMOVE your UltraSound card.
» With your fingers, remove the black, plastic clips from the four sets of jumpers
shown in Figure 1. Do not remove any other clips!
Important! Keep the jumper clips in a safe place in case you want to remove the
16-bit card later for any reason. If you do wish to remove the 16-bit card and use
the UltraSound without the daughter card, replace the jumper clips in the
positions shown in Figure 1._________________
|
|
|
|
|
|
|
|
|
|
|
|
|
|
|
|
Fig. 1 -Location of jumpers to be removed from the UltraSound
|
|
|
|
|
|
|
|
Note! If you don't remove these jumpers, it will not be possible to attach your 16-
bitcard to your UltraSound.
» If the jumpers remaining on your UltraSound are pull tab jumpers, fold over the
tabs, or cut them off, before installing your card.
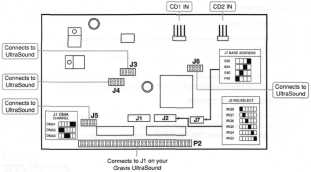
» Turn over the card and firmly connect the P2 connector on the 16-bit card to
the Ultrasound's Jl connector (see Figure 2).
Make sure the pins are aligned. If the pins do not line up, try to insert the card
on an angle. Align the pins on the first row first, then press down. If the card
does not go on with firm pressure, do not force it. Look at the UltraSound board
to see whether a capacitor or other component is too close to one of the jumper
sockets. Gently bend any such components away from the connector.
|
|
|
|
|
|
|
|
|
|
|
|
|
|
|
|
Fig. 2 - The 16-bit card and connections
|
|
|
|
|
|
|
|
|
|
|
|
|
|
|
|
|
|
|
|
» Check that you've fully inserted all of the pins. The card should be snug against
the UltraSound card's external connector plate. The notched ends of the plastic
connector pegs must snap through the guide holes to the back of the
UltraSound board. If the connector pegs are difficult to snap through the guide
holes on the UltraSound, remove the 16-bit card, pull out the connector pegs,
and insert the opposite ends of the pegs into the 16-bit card. Then re-install.
» Reconnect the CD audio cable, if you have one, to GDI IN or CD2 IN on the 16-
bit card. You must use the CD connectors on the 16-bit card, NOT on the
UltraSound.
* Re-insert your UltraSound card, with the daughter card attached, into your
computer.
Note! This installation guide covers adding the 16-bit card to your UltraSound.
See your UltraSound installation guide for instructions on installing the
card into your PC.
You may wish to leave the cover off of your computer until you have finished the
software setup, in case you need to change settings on the 16-bit card .
Be careful not to insert your UltraSound too close to another card in your
computer. If you have the slot space available, keep your UltraSound and 16-Bit
Recording Option one slot away from other cards.
INSTALLING THE SOFTWARE
Before you begin...
Please note that installation for both DOS and Windows software is done in DOS,
NOT Windows.
It's a good idea to make a working copy of your original disks. Use the copy to
install your software, and keep the originals in a safe place.
The software on the installation disks is compressed; during installation, it will be
decompressed to about 5 MB of disk space on your hard drive.
It's a good idea to disable any TSR (Terminate and Stay Resident) programs before
installing software.
During installation, the software will be copied into your UltraSound directory. We
recommend that you use the directory where your original UltraSound files reside.
The required configuration information will be added to your system's configura-
tion and start-up files automatically.
Getting Started
To install, please perform the following:
» Insert the 16-Bit Software Disk into your 3.5" disk drive A: or B:.
» From DOS:
Type: A:\INSTALL (OR B:\INSTALL) <enter>
Please follow the instructions on screen to install your UltraSound software.
Simply press <enter> to install all software onto your hard drive.
UltraSound Setup Program
The Setup program is a utility to help you choose the correct configuration
settings for your UltraSound card. Its purpose is to make it as easy as possible for
you to get Base Address, DMA and IRQ settings that work in your computer.
Advanced
GRAVIS
Printed in Canada 901-0056-00
|
|
|
|
|
|
|
|
|
|
|
|
|
|
|
|
|
|
|
|
Gravis defaults to the following jumper settings on the 16-bit recording card: Base
Port Address (J7 on your 16-bit card) is set to 530 Hex. IRQ (J2) is set to 5, and
DMA (Jl) is set to 3. If a conflict occurs (two devices using the same resource
like DMA or IRQ), you have the option to set the jumpers yourself: remove the 16-
bit card and refer to the charts printed on the card for settings.
Note that the DMA and IRQ settings for the 16-bit card must be different from
those of the UltraSound.
The Setup program is run automatically when you do the install. If you need to
run it later for any reason:
» From the directory you installed the 16-bit software into, Type: SETUP <enter>.
TROUBLESHOOTING
If the setup program doesn't detect your 16-bit card (i.e., no 16-bit options are
shown in Setup):
Make sure you have attached it properly to your UltraSound.
Make sure the software is installed and running from the correct directory.
CUSTOMER SUPPORT
Advanced Gravis is proud of the quality, design and workmanship that goes into
all of our products. However, occasionally a customer has difficulty installing or
using the product. This section tells you how to reach Gravis Technical Support.
Registration
It is important that you fill out and mail the enclosed registration card. Registra-
tion is important because it ensures that your name is added to our customer data
base. If you are in our data base, you are eligible for:
Access to FREE technical support.
Notification of significant upgrades.
Access to special offers and discounts available only to registered users.
Technical Support
There is no charge for Technical Support, but you may have to pay long distance
telephone charges, or on-line charges for bulletin board systems.
|
|
|
|
|
|
|
|
Technical Support Tips
To keep long distance or on-line charges to a minimum:
Call from a phone where you have access to your computer. You will then
be able to test suggestions immediately and provide any additional
information that may be required.
The best time to call is between 10:30 AM - noon and 1:30-3:00 PM Pacific
Coast Time.
Please prepare the following information:
Your name, address and telephone number.
The Gravis product you are calling about. We make several products.
The make and model of your computer.
The version numbers of your computer's system software and any other
software you've installed, especially memory managers or special drivers.
The IRQ, DMA, and Address information mentioned in the Notes section.
|
|
|
|
|
|
|
|
|
|
|
|
|
|
|
|
|
|
|
|
Technical Support-Telephone
Call Advanced Gravis Technical Support at (604) 431-1807. Or fax your question,
with all the above information, to our fax number: (604) 451-9358
Support hours are 9 AM - 4 PM Pacific Coast Time.
Technical Support-Electronic Mail
Advanced Gravis can be contacted by modem at the following addresses:
CompuServe Support Forum: GO PCVENB area #14
Advanced Gravis BBS: (604) 431-5927
Gravis BBS modem setting: 14,400V32.bis baud N81
Internet: tech@gravis.com
Anonymous FTP: archive.epas.utoronto.ca pub/pc/ultrasound
FidoNET: 1:153/978
America On-line: email Adv/Gravis go keyword Gravis
Genie: GamesRT Category 1 Topic 6
When contacting Gravis via electronic mail, it is very important that you provide
all the information described in the previous section. Otherwise, it will take longer
to get back to you with a complete answer.
|
|
|
|
|
|
|
|
GENERAL INFORMATION
License Agreement
The 16-bit Recording Option is protected by copyright, and all rights are reserved by Advanced Gravis Computer
Technology Ltd. This User's Guide is published exclusively by Advanced Gravis Computer Technology Ltd.
Information in this document is subject to change without notice and does not represent any commitment on the
part of Advanced Gravis Computer Technology Ltd.
Trademarks
UltraSound is a trademark of Advanced Gravis Computer Technology Ltd. All other trademarks and registered
trademarks are the property of their respective owners.
Warranty Information
Advanced Gravis Computer Technology Ltd. (hereinafter referred to as GRAVIS) warrants to the original purchaser
of the Gravis 16-bit Recording Option (hereinafter referred to as 16 BIT CARD) manufactured by GRAVIS that it
will be free from defects in materials and workmanship for a period ofl year from the original date of purchase.
Information on obtaining warranty services is provided in the "Warranty Claim Instructions" section. You must
provide proof of purchase when requesting repairs during the warranty period. All warranty claims must be sent to
GRAVIS do not return your 16 BIT CARD to the place of purchase. GRAVIS is not responsible for any indirect,
special, incremental, consequential, or similar damages or loss of data or profits to you or any other person
regardless of the legal theory, even if we have been advised of the possibility of such damage. Some states do not
allow the exclusion or limitation of consequential damages, so the above limitation or exclusion may not apply to
you. Our liability for any damage to you or any third party in the event that any of the above limitations are held
unenforceable shall not exceed three times the fee you paid for the 16 BIT CARD regardless of the form of any claim.
During the warranty period, GRAVIS will repair (or at its option replace with a reconditioned 16 BIT CARD at no
extra charge) components that are defective, provided the 16 BIT CARD is returned with proof of purchase and
shipped prepaid to Advanced Gravis. Please see the addresses below.
Warranty Claim Instructions
Carefully read the warranty section and provide a detailed description of the problem, including the make and
model of your computer system, andthename, version, and publisher of the software you are using. Themeansof
product shipment to GRAVIS is at your cost and discretion. We suggest that you insure your Gravis 16 BIT CARD in
case of loss or damage during shipment. GRAVIS is not responsible for product lost or damaged in shipment.
Advanced Gravis Computer Technology Ltd.
Canadian and International Customers US Customers
101-3 750 North Fraser Way 1790 Midway Lane
Burnaby, British Columbia Canada Bellingham, Washington 98226
V5J5E9 USA
|
|
|
|
|
|
|
|
|
|
|